Map object to another by using AutoMapper in C# Asp.Net Core
Map object to another object in C# Asp.Net Core is a step we have to do every day. Normally we use a constructor to map. In this article, I introduce Automapper library to help map easy, and simple.
- 1. Problem of map an object to another object
- 2. What is AutoMapper?
- 3. How’s Automapper working?
- 3.1. Installation
- 3.2. Configuration and registration mapping
- 3.3. Normal mapping
- 3.4 Constructor Mapping
- 3.4. Complex mapping
- 3.5. Reverse Mapping
- 4. Test performance of Automapper.
- 5. Conclusion
When developing a website with Asp.net core, with a small or normal website we usually choose N-Tier architecture to build the structure of the project. And have a problem with how to map an object value to another object. So in this article, I will discuss it.
1. Problem of map an object to another object

In your project, you will have many layer projects such as Dal, Bsl, Presentation …. These layers always have their own model. For example, the Bsl layer wants to get data from the Dal layer and wants to convert the model of Dal to Bsl. and here many people will ask why Bsl layer does not use the model of the Dal layer?
- Answer: Model in Dal layer also called as a Dto(data transfer object) it maps with columns select of SQL query and model of Bsl maybe need less column then the model of Dal, and it also contains some other property such as build link, format date… In general, you can understand that model of Bsl presents a view of the end-user and model(dto) of Dal present for a select SQL query. If you use only one model, that model will become chaotic and redundant.
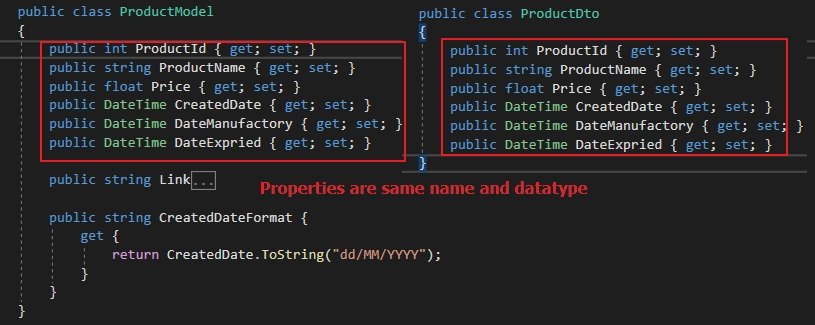
To map an object to another object, we have many ways to do it and the popular way is to use a class constructor to map all their properties. For example, I have two modes ProductDto and ProductModel, see code below:
ProductDto.cs is model of Dal layer
public class ProductDto
{
    public int ProductId { get; set; }
    public string ProductName { get; set; }
    public float Price { get; set; }
    public DateTime CreatedDate { get; set; }
    public DateTime DateManufactory { get; set; }
    public DateTime DateExpried { get; set; }
}
ProductModel.cs is model of Bsl layer
public class ProductModel
{
    public int ProductId { get; set; }
    public string ProductName { get; set; }
    public float Price { get; set; }
    public DateTime CreatedDate { get; set; }
    public DateTime DateManufactory { get; set; }
    public DateTime DateExpried { get; set; }

    public string Link
    {
        get
        {
            return string.Format("/{0}-pid{1}", ProductName, ProductId);
        }
    }

    public string CreatedDateFormat {
        get {
            return CreatedDate.ToString("dd/MM/YYYY");
        }
    }
}
Okay, now I want to map ProductDto to ProductModel we have to create a constructor for ProductModel as below:
public ProductModel(ProductDto dto)
{
    ProductId = dto.ProductId;
    ProductName = dto.ProductName;
    Price = dto.Price;
    CreatedDate = dto.CreatedDate;
    DateManufactory = dto.DateManufactory;
    DateExpried = dto.DateExpried;
}
And we can easily map with one line code as below:
var prodDto = _productDal.GetById(productId);
var prodModel = new ProductModel(prodDto);
Oh, I think it is so easy and shortcode. But this is only a demo example, in the real project a database has more than one hundred tables and some tables have more than one hundred columns. And you have to create many constructors and mapping many properties. It is really a waste of your time and maybe lacking.
To fix this problem, in this article I will introduce using Automapper in .net core, it’s a library to help map an object to another in C# Asp.Net Core.
2. What is AutoMapper?
Automapper is a library that helps you to copy data from one object to another. It supports mapping in many ways such as mapping the same or different property name, also can map different property data types, and it can map a single object or a list object.
Pros
- Short & clear code
- Configure simple
- Easy apply to project
Cons
- Performance mapping is slow
- Different to debug code
3. How’s Automapper working?
3.1. Installation
To install Automapper you can download from Nuget or use Package Manager.
PM> Install-Package AutoMapper.Extensions.Microsoft.DependencyInjection -Version 8.1.1
Or search AutoMapper.Extensions.Microsoft.DependencyInjection keyword in Nuget and install the latest version. This package has a dependency on AutoMapper, so it will also be installed.
3.2. Configuration and registration mapping
For example, I still have 2 models are ProductDto and ProductModel as above. And now we can config Automapper inside ConfigureServices method of Startup class as below:
// Register AutoMapper
var mapperConfig = new MapperConfiguration(cfg =>
{
    cfg.AllowNullCollections = true;
    cfg.ForAllMaps((map, exp) =>
    {
        foreach (var unmappedPropertyName in map.GetUnmappedPropertyNames())
            exp.ForMember(unmappedPropertyName, opt => opt.Ignore());
    });

    // Register Model & Dto will be map here.
    cfg.CreateMap<ProductDto, ProductModel>();

});
In that :
- AllowNullCollections : This option helps allow null destination collections. If true, null source collections result in null destination collections. Default false. If it’s set to false maybe throw an exception because in some cases the properties are not the same data type...
- CreateMap() : Help creates a mapping configuration from the TSource type to the TDestination type. You can register many models that need to map here.
3.3. Normal mapping
Normal mapping is all properties in both models are the same name and data type. They may not have the same amount of property.

This map is so very easy and fast about performance. To execute mapping we can do step by step as below:
STEP 1: Register mapping object to Automapper.
Inside MapperConfiguration() method register in Starup.cs you can add mapping objects here.
cfg.CreateMap<ProductDto, ProductModel>();
STEP 2: Use mapping in your business code
public class ProductBsl : IProductBsl
{
    private readonly IProductDao productDal;
    private readonly IMapper mapper;

    public ProductBsl(IProductDao productDal, IMapper mapper)
    {
        this.productDal = productDal;
        this.mapper = mapper;
    }

    public List<ProductModel> GetListProduct(int top)
    {
        var lstProduct = productDal.GetListProduct(top);
        return mapper.Map<List<ProductDto>, List<ProductModel>>(lstProduct); // mapping models here
    }
}
It seems very simple!! In the above sample code, I mapped a list object to a list object. If you only want to map object value to another object, you can map as below:
mapper.Map<ProductDto, ProductModel>(productDtoObj);
And if you want to map two IEnumerable objects you can map as below:
mapper.Map<IEnumerable<ProductDto>, IEnumerable<ProductModel>>(lstProduct);
3.4 Constructor Mapping
Automapper also supports mapping by using the constructor of the model, same with manual map. For example as below:
STEP 1: In ProductModel I’ll create a constructor :
public ProductModel(ProductDto dto)
{
    ProductId = dto.ProductId;
    ProductName = dto.ProductName;
    Price = dto.Price;
    CreatedDate = dto.CreatedDate;
    DateManufactory = dto.DateManufactory;
    DateExpried = dto.DateExpried;
}
STEP 2: And now I will register mapping as below:
cfg.CreateMap<ProductDto, ProductModel>().ConstructUsing(x => new ProductModel(x));
STEP 3: Call mapping as Normal Mapping way in above:
mapper.Map<List<ProductDto>, List<ProductModel>>(lstProduct);
3.4. Complex mapping
Complex mapping is mapping one or more properties that are not of the same name or map sub-model with sub-model or sub-model with some properties.
Case 1: Mapping property with the property but they are not the same names.
See two models below:

And now I want to map Id property with ProductId property. We can register as below:
cfg.CreateMap<ProductDto, ProductModel>()
   .ForMember( dst => dst.Id, act => act.MapFrom(src => src.ProductId));
Case 2: Map submodel with a submodel.
For example, I have four models/dtos as below:
public class OrderModel
{
    public decimal Total { get; set; }
    public CustomerModel CustomerModel { get; set; }
}

public class CustomerModel
{
    public string Name { get; set; }
}

public class OrderDto
{
    public decimal Total { get; set; }
    public CustomerDto Customer { get; set; }
}

public class CustomerDto
{
    public string Name { get; set; }
}
Now I want to map OrderDto to OrderModel I can register map as below:
cfg.CreateMap<OrderDto, OrderModel>()
   .ForMember(dst => dst.CustomerModel, act => act.MapFrom(src => src.Customer));
And If I change the Name property of CustomerModel model to ProductName. I can register mapping as below:
 cfg.CreateMap<OrderDto, OrderModel>()
    .ForMember(dst => dst.CustomerModel.ProductName, act => act.MapFrom(src => src.Customer.Name));
Case 3: Map submodel with some properties
I have three modes as below, and I want to map OrderDto to OrderModel:
public class OrderModel
{
    public decimal Total { get; set; }
    public CustomerModel Customer { get; set; }
}

public class CustomerModel
{
    public string Name { get; set; }
}

public class OrderDto
{
    public decimal Total { get; set; }
    public string CustomerName { get; set; }
}
So how can I map Customer property with CustomerName property? oh! We can map as below:
 cfg.CreateMap<OrderDto, OrderModel>()
    .ForMember(dst => dst.Customer.Name, act => act.MapFrom(src => src.CustomerName));
3.5. Reverse Mapping
The Automapper Reverse Mapping is nothing but two-way mapping which is also called bidirectional mapping.
As of now, the mapping we discussed is one-directional means if we have two types let’s say Type A and Type B, then we Map Type A with Type B. But using Automapper Reverse mapping it is also possible to Map Type B with Type A.
Let us understand AutoMapper Reverse Mapping in C# with an example.
For example, I have 3 classes Order, Customer and OrderDto as below:
public class Order {
  public decimal Total { get; set; }
  public Customer Customer { get; set; }
}

public class Customer {
  public string Name { get; set; }
}

public class OrderDto {
  public decimal Total { get; set; }
  public string CustomerName { get; set; }
}
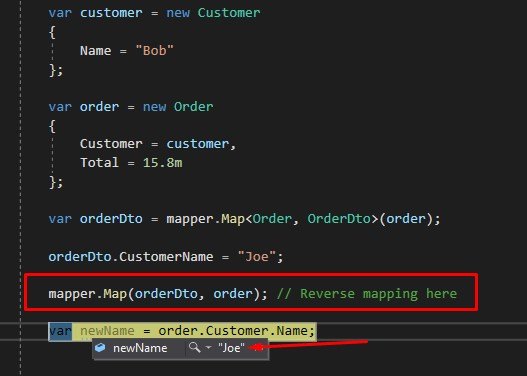
Now I need to map the value of Order to OrderDto and then I change some value of OrderDto and I want to reverse the value of OrderDto to Order.
We can register reverse mapping as below:
cfg.CreateMap<Order, OrderDto>()
   .ForMember(d => d.CustomerName, opt => opt.MapFrom(src => src.Customer.Name))
   .ReverseMap()
   .ForPath(s => s.Customer.Name, opt => opt.MapFrom(src => src.CustomerName));
And in your business code, you can use Map() method to reverse object values. See the business code in the image below:

4. Test performance of Automapper.
I created some cases to test the performance of Automapper and compare it with Manual map using a constructor. You can see the image below:

You can see something like that:
- Manual mapping is very fast, with a million rows it only takes 70 microseconds.
- If mapping about < 100 rows Automapper Complex is always better than Automapper Normal.
- If mapping many properties and many rows, the Complex mapper's slows down.
You can download source code test performance Automapper from Github here.
5. Conclusion
In this article I want to introduce Automapper in C# .Net Core, how to use it and resolve the problem map object to another object in C# .Net Core, I only want you to know that Automapper or manual mapper is used for different targets. If you want shortcode and code fast you can use Automapper but if you require good performance you can choose manual mapper. Not which is better.
Happy code!!!
List questions & answers
-
1. what is AutoMapper in c# .Net Core?The AutoMapper is a library that helps copy data of an object to another object in C# very short code, easy to use. It is more like an object-object mapper. It solves the problem of manually mapping each property of a class with the same properties of another class. Before AutoMapper was introduced if we wanted to assign one object property to another object property then we were following a long procedure.
-
2. Is AutoMapper slow ?
-
3. How to ignore properties in Automapper?
-
4. When should I use Automapper?


COMMENT