Easy to enable Swagger UI interface in ASP.NET Core 3.1 API
Swagger is a helpful build-in UI interface in ASP.NET Core API to help manage and execute all API in your project. It looks like Postman but it is smaller and built-in inside your project. You can test your APIs in the browser right now when you started your project.
- 1. Setup environment & Create API project
- 1.1 Setup environment
- 1.2 Create API project
- 2. Config Swagger UI interface
- 2.1 Package installation
- 2.2 Add and configure Swagger middleware
- 2.3. Config information and description for Swagger
- 2.4 Config and generate XML comment for API
- 2.4.1 Display some comment introduce about an API
- 2.4.2 Display example execute input for API
- 2.4.3 Set a param is required when executing API
- 3. Config authentication for Swagger UI
- 4. Summary
In the article, I will guide how to config the Swagger UI in ASP.NET Core 3.1 Web Api and execute some API and see the result.
1. Setup environment & Create API project
1.1 Setup environment
- Visual studio 2019
- Asp.net Core 3.1
- Browser Chrome, Firefox, Opera...
1.2 Create API project
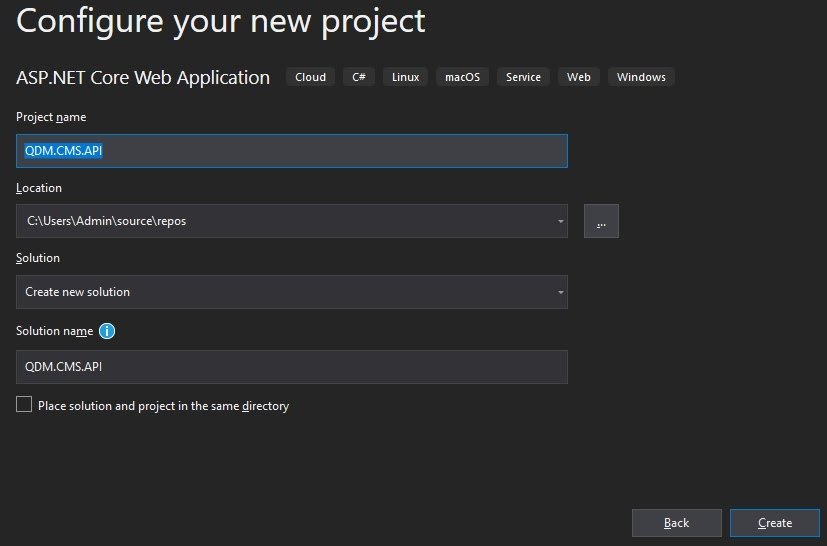
Open visual studio and press Ctrt + Shift + N. You will see dialog as below:

Select Asp.Net Core Web Application type project and click Next button.

Enter your Project name and change Location store project if you need and click Next button.

Select version Asp.net core to 3.1 and select project type is API and click Create button.
2. Config Swagger UI interface
2.1 Package installation
Swashbuckle can be added with the following approaches:
+ Option 1: Using the Package Manager Console window
From the menu bar of vs2019 select View > Other Windows > Package Manager Console
and then execute the command below:
Install-Package Swashbuckle.AspNetCore -Version 5.5.0
+ Option 2: Using Nuget package
Right-click in the project and select Manage NuGet Packages… item

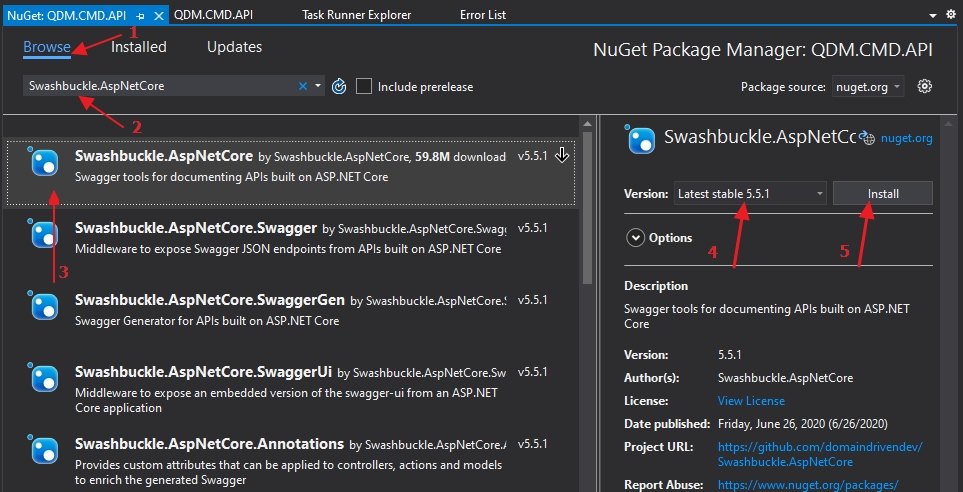
Select the tab Browse and type Swashbuckle.AspNetCore, See Image below:

Select the first item result and select the version of swagger, you can use version 5.5.0 or the latest version and then click Install button.
2.2 Add and configure Swagger middleware
Firstly, we need to register Swager to service the container inside of the Startup.ConfigureServices() method.
public void ConfigureServices(IServiceCollection services)
{
   ……..
   // Register the Swagger generator, defining 1 or more Swagger documents
    services.AddSwaggerGen();
   ……..
}
Secondly, In the Startup.Configure method, enable the middleware for serving the generated JSON document and the Swagger UI:
public void Configure(IApplicationBuilder app, IWebHostEnvironment env)
{
    --------
    // Enable middleware to serve generated Swagger as a JSON endpoint.
    app.UseSwagger();

    // Enable middleware to serve swagger-ui(HTML, JS, CSS, etc.),
    // specifying the Swagger JSON endpoint.
    app.UseSwaggerUI(options =>
    {
        options.SwaggerEndpoint("/swagger/v1.0/swagger.json", "Versioned API v1.0");
        options.RoutePrefix = string.Empty;
        options.DocumentTitle = "Title Documentation";
        options.DocExpansion(DocExpansion.List);
    });

    --------
}
Okay, now we can build the project, run and see the result.
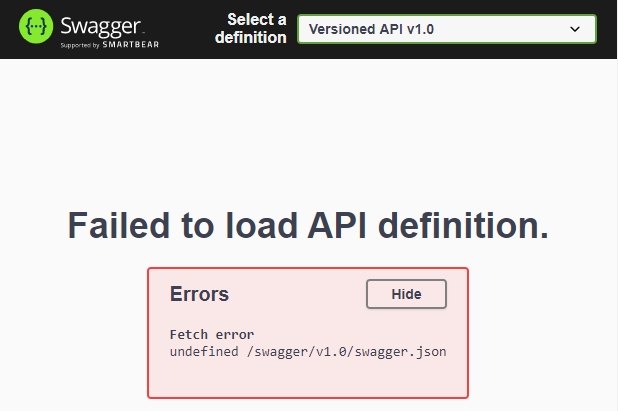
Notice that, when you run the project, your default URL will be https://localhost:{port}/weatherforecast if you still have not changed the route code after creating the project. To see Swagger UI please change the URL to https://localhost:{port}/index.html. BUT you will see an error Failed to load API definition with Swagger UI.

This error occurs when you do not set information for Swagger.
2.3. Config information and description for Swagger
You can display some information such as version, title, description, the term of service, contact, license... For your API you can set it with Swagger as below.
In the Startup class, import the following namespace to use the OpenApiInfo class:
using Microsoft.OpenApi.ModelsWe need to modify the middleware of Swagger as below:
// Register the Swagger generator, defining 1 or more Swagger documents
services.AddSwaggerGen(c =>
{
    c.SwaggerDoc("v1.0", new OpenApiInfo
    {
        Version = "v1.0",
        Title = "ToDo API",
        Description = "A simple example ASP.NET Core Web API",
        TermsOfService = new Uri("https://quizdeveloper.com/term-and-condition"),
        Contact = new OpenApiContact
        {
            Name = "QuizDev",
            Email = string.Empty,
            Url = new Uri("https://quizdeveloper.com"),
        },
        License = new OpenApiLicense
        {
            Name = "Use license",
            Url = new Uri("https://quizdeveloper.com"),
        }
    });
});
Okay, now we can build and see the result.

2.4 Config and generate XML comment for API
To generate an XML file for Swagger you can right-click to project and select Properties option.

And then select Build tab, with Output path textbox type bin\Debug\ And checked to checkbox XML documentation file and type name of XML file to textbox control. Look image below :

Press Ctrl + S to save config and then press Ctrl + Shift + B to build project, after build finished you will see an XML file created in the output path and root folder.

Okay, After generating XML we need to change some config of Swagger to read this XML file.
Open method ConfigureServices() of Starts.cs class. We need to modify the middleware of Swagger as below:
services.AddSwaggerGen(options => {
    .......  Some other code here

    var filePath = System.IO.Path.Combine(AppContext.BaseDirectory, "QDM.CMS.API.xml");
    options.IncludeXmlComments(filePath);
});
2.4.1 Display some comment introduce about an API
To display some text guide about API, we can use the comment above API to do, using <summary> to the description. Look example as below:

And this is the result :

2.4.2 Display example execute input for API
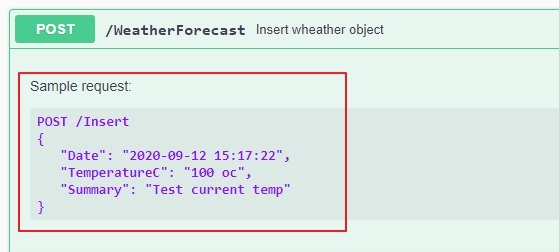
To display an example input to the guideline for user easy execute an API you can use <remark> tag to display, you can see the example below:

And below is the result:

2.4.3 Set a param is required when executing API
To make any param is required input you need to mark the property with [Required] attributes, found in the System.ComponentModel.DataAnnotations namespace, to help drive the Swagger UI components.
public class WeatherForecast
{
    [Required]
    public DateTime Date { get; set; }

    [Required]
    public int TemperatureC { get; set; }

    public int TemperatureF => 32 + (int)(TemperatureC / 0.5556);

    public string Summary { get; set; }
}
You have to set from [FromQuery] front parameter of Api to display required * and textbox input. Don’t forget that this function is only used for the GET method.

And this is the result:

3. Config authentication for Swagger UI
To enable authentication for Swagger we need to config some code. You can refer to the code below.
Open method ConfigureServices() of Starts.cs class. We need to modify the middleware of Swagger as below:
services.AddSwaggerGen(options => {
    .......  Some other code here

    // Config Authentication for Swagger
    options.AddSecurityDefinition("oauth2", new OpenApiSecurityScheme
    {
        Description = "JWT Authorization header using the Bearer scheme. Example: \"Authorization: Bearer {token}\"",
        Name = "Authorization",
        In = ParameterLocation.Header, // Where is store user information?
        Type = SecuritySchemeType.ApiKey // What is type of authentication?
    });

});
In this code, I chose the authentication type is JWT, with a bearer token header. If you login with another type you can set it with another option.
You can rebuild code, run and see results, you will see login button on the Swagger page.

Click this button you will see a dialog, input value login to login, this step helps pass some API required authentication before access.
For example, add jwt bearer authorization to swagger in asp.net core 3.1 you can config swagger as below:
services.AddSwaggerGen(options =>
{
    options.SwaggerDoc("v1.0", new OpenApiInfo { Title = "Main API v1.0", Version = "v1.0" });

    var securitySchema = new OpenApiSecurityScheme
    {
        Description = "JWT Authorization header using the Bearer scheme. Example: \"Authorization: Bearer {token}\"",
        Name = "Authorization",
        In = ParameterLocation.Header,
        Type = SecuritySchemeType.Http,
        Scheme = "bearer",
        Reference = new OpenApiReference
        {
            Type = ReferenceType.SecurityScheme,
            Id = "Bearer"
        }
    };
    options.AddSecurityDefinition("Bearer", securitySchema);

    var securityRequirement = new OpenApiSecurityRequirement();
    securityRequirement.Add(securitySchema, new[] { "Bearer" });
    options.AddSecurityRequirement(securityRequirement);


    var filePath = System.IO.Path.Combine(AppContext.BaseDirectory, "QDM.CMS.API.xml");
    options.IncludeXmlComments(filePath);
});
4. Summary
Swagger UI in Asp.net Core 3.1 Web API is a very helpful tool, it’s small, built-in and easy custom, easy use. So I hope this article brings some information helpful to you.
You can download the source code to refer to here.
Happy code.
List questions & answers
- 1. What is swagger UI in Web API .Net Core?Swagger is open-source API documentation that helps us to understand API service methods. When we consume a web API, then understanding its various methods and verbs can be challenging for a developer. This solves the problem of generating documentation. It's also known as OpenAPI. Swagger helps design & document all your REST APIs in one collaborative platform. SwaggerHub Enterprise. Standardize your APIs with projects, style checks, and reusable domains. Swagger Inspector. Test and generate API definitions from your browser in seconds.
- 2. What is swagger UI used for?
- 3. Is swagger similar to postman?
- 4. Which is better swagger or postman?


COMMENT